 Box contents
 Setting up the All-In-One with a computer
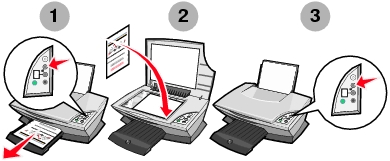
Setting up the All-In-One without a computer
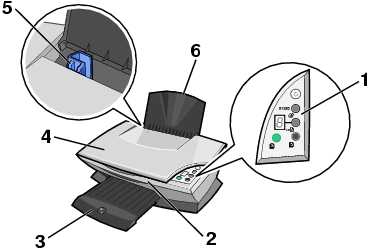
Understanding the parts of the All-In-One
Your All-In-One can be used with or without a computer. If you are using your All-In-One without a computer, make sure you follow the additional instructions provided in Setting up the All-In-One without a computer.
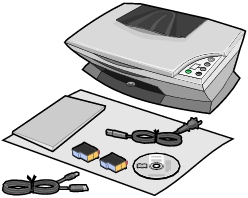
The following items are included with your All-In-One:
These items are sometimes included with your All-In-One:
To set up your All-In-One, follow the instructions on the Lexmark 2200 Series Setup Sheet to install the hardware and software. If problems occur during the setup process, see Troubleshooting.
If you are using your All-In-One without a computer, make sure you follow the steps on the Setup Sheet to complete hardware installation. Continue with the following steps to optimize print quality.
|
|
Use this |
To |
|---|---|---|
|
1 |
Control panel |
Use the buttons to operate the All-In-One (see Using the control panel for details about each of the buttons). |
|
2 |
Scanner unit |
Lift to access the print cartridges. |
|
3 |
Paper exit tray |
Extend to hold paper as it exits the All-In-One. |
|
4 |
Scanner lid |
Lift to place an item on the scanner glass. |
|
5 |
Paper guide |
Slide next to paper to ensure proper feeding. |
|
6 |
Paper support |
Lift to load paper into the All-In-One. |
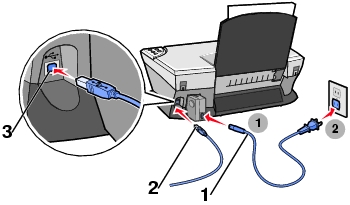
Note: Insert the power supply into the All-In-One before connecting the power supply into the wall outlet.
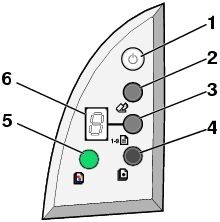
The All-In-One has a control panel that lets you scan and copy with the press of a button and a display that alerts you to the number of copies you have selected and warns you when there is an error by blinking a two digit number, one number at a time.
|
|
Use this |
To |
|---|---|---|
|
1 |
Power/Resume |
Turn the All-In-One on or off. |
|
2 |
Scan |
Start the scanning process and open the Lexmark All-In-One Center. |
|
3 |
Copy Quantity |
Change the number of copies to make. |
|
4 |
Black Copy |
Make a black and white copy. Note: To make a black copy using the Best Quality, press this button and hold for at least two seconds. |
|
5 |
Color Copy |
Make a color copy. Note: To make a color copy using the Best Quality, press this button and hold for at least two seconds. |
|
6 |
Display |
|