 Parts
Parts
Control panel
Software
The Lexmark 6200 Series is a color scanner, color printer, color copier, and color PC fax machine.
Note: You do not have to attach your All-In-One to a computer to make copies or to print photos from a digital camera.
Parts
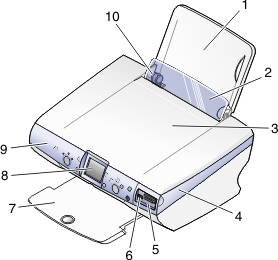
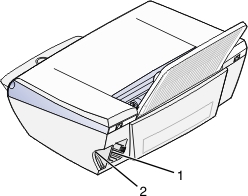
The tables following each graphic describe the parts of the All-In-One.
|
|
Use the
|
To
|
|
1
|
Paper support
|
Load paper.
|
|
2
|
Paper feed guard
|
Prevent small objects from falling inside.
|
|
3
|
Top cover
|
Place an item on, or remove an item from, the scanner glass.
|
|
4
|
Scanner unit
|
Raised: Access the print cartridges.
Lowered: Scan items placed on the scanner glass.
|
|
5
|
Memory card door
|
Access the memory card slots and PictBridge port.
|
|
6
|
PictBridge port
|
Connect a PictBridge-enabled digital camera to the All-In-One. Use the controls on the camera to select and print your photos.
|
|
7
|
Paper exit tray
|
Stack paper as it exits.
The paper exit tray can hold:
- 25 sheets of plain paper
- 20 sheets of labels
- 10 envelopes
- 20 cards
- 1 transparency
- 1 photo/glossy page
Note: To avoid smudging ink, remove each transparency or photo/glossy page from the paper exit tray before the next one exits. Photos and transparencies may require up to 15 minutes to dry.
|
|
8
|
Control panel display
|
- Preview documents and photos on the scanner glass or images from memory cards.
- Check the status of the All-In-One.
|
|
9
|
Control panel
|
Operate the All-In-One (see Using the control panel for details about each of the buttons).
|
|
10
|
Paper guide
|
Make sure the paper feeds correctly.
|
|
|
Use the
|
To
|
|
1
|
Power supply port
|
Install the provided power supply.
|
|
2
|
USB port
|
Connect the All-In-One to the computer using a USB cable.
|
Control panel
Using the control panel
|
|
Use
|
To
|
|
1
|
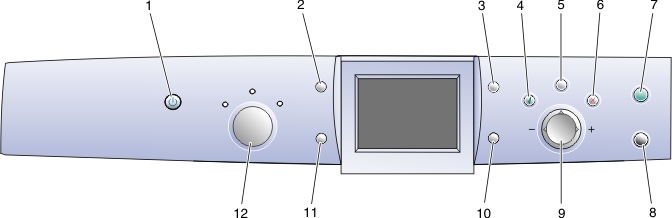
Power
|
Turn the All-In-One on and off.
|
|
2
|
Rotate
|
Rotate the image on the control panel display 90 degrees for easier viewing of photos.
|
|
3
|
Page Preview
|
Preview an image before it is printed, scanned, or copied.
Note: Multiple previews can be made before scanning.
In Photo Card mode, you can preview multiple pages. Use the arrow buttons to scroll through the photos.
|
|
4
|
Select
|
- Choose a menu option.
- In Photo Card mode, select or deselect a photo to be printed.
|
|
5
|
Menu
|
- Copy: Display the Copy menu, or return to the default Copy menu screen.
- Scan: Display the Scan menu, or return to the default Scan menu screen.
- Photo: Display the Photo menu, or return to the default Photo menu screen.
|
|
6
|
Stop/Clear
|
- Cancel a copy, scan, or print job.
- In Photo Card mode, deselect the preview photo selected.
Other helpful information about this button:
- When viewing a photo, you can cancel all photo selections. Press Stop/Clear twice, and then follow the instructions on the control panel display.
- When copying, you can return to default settings: from a default mode screen, press Stop/Clear twice.
|
|
7
|
Color Start
|
Start a color copy, scan, or photo job, depending on which mode is selected.
- Copy: Start a color copy.
- Scan: Start a color scan.
- Photo Card: Start a color print job.
|
|
8
|
Black Start
|
Start a black-and-white copy, scan, or photo job, depending on which mode is selected.
- Copy: Start a black-and-white copy.
- Scan: Start a black-and-white scan.
- Photo Card: Start a black-and-white print job.
|
|
9
|
Up arrow
|
- Scroll through menu options.
- Change the selected area when cropping an image.
- In Photo Card mode, skip forward through the memory card to view every tenth picture on the control panel display.
- In Copy mode, change the blank paper size.
|
|
Down arrow
|
- Scroll through menu options.
- Change the selected area when cropping an image.
- In Photo Card mode, skip backward through the memory card to view every tenth picture on the control panel display.
- In Copy mode, change the blank paper size.
|
|
Right arrow (+)
|
- Scroll through menu options.
- Change the selected area when cropping an image.
- Increase the number of copies.
- Display the next picture on a memory card.
|
|
Left arrow (-)
|
- Scroll through menu options.
- Change the selected area when cropping an image.
- Decrease the number of copies.
- Display the previous picture on a memory card.
|
|
10
|
Resize
|
In Copy mode:
In Scan mode:
In Photo Card mode:
- Set the image size of photos.
- While cropping, zoom in or zoom out on a photo.
|
|
11
|
Number of Copies
|
In Copy and Photo Card modes:
In Scan mode:
|
|
12
|
Mode
|
Select Copy, Scan, or Photo Card mode.
Note: The current selection is indicated by one of three indicator lights.
|
Navigating the control panel menus
- Press Mode to select the Copy, Scan, or Photo Card mode.
- Press Menu to open the menu structure of the selected mode.
- Press the up and down arrows to scroll through the menus in the current mode.
- Press the left and right arrows to scroll through the options list of the highlighted item.
- Press Select to choose a setting.
Copy menu
|
From this menu item
|
You can
|
|
Copy Quality
|
Select a print quality.
|
|
Brightness
|
Lighten or darken the copied image.
|
|
Blank Paper Size
|
Specify the size of paper loaded in the paper support.
|
|
Repeat Image
|
Specify the number of images to place on one page.
|
|
Size of Original
|
Specify the size of the original document loaded on the scanner glass.
|
|
Maintenance
|
- Check ink levels.
- Change cartridges.
- Align cartridges.
- Clean cartridges.
- Print a test page.
|
|
Defaults
|
- Restore default settings.
- Specify the type of paper loaded in the paper support.
- Select a language for the display text.
- Adjust when settings are cleared (After 2 minutes or Never).
- Specify when the All-In-One enters Power Save mode.
|
Scan menu
|
From this menu item
|
You can
|
|
Maintenance
|
- Check ink levels.
- Change cartridges.
- Align cartridges.
- Clean cartridges.
- Print a test page.
|
|
Defaults
|
- Restore default settings.
- Select a language for the display text.
- Adjust when settings are cleared (After 2 minutes or Never).
- Specify when the All-In-One enters Power Save mode.
|
Photo Card menu
|
From this menu item
|
You can
|
|
Blank Paper Size
|
Specify the size of paper loaded in the paper support.
|
|
Print Quality
|
Select a print quality.
|
|
Brightness
|
Lighten or darken the photo image.
|
|
Crop
|
Crop an image.
|
|
Print All Photos
|
Print all of the photos saved on a memory card.
|
|
Slide Show
|
View a slide show of the photos saved on a memory card.
|
|
Print Index Page
|
Print an index of the photos on a memory card.
|
|
View Photos or Print
|
Browse through images on the inserted memory card and select which images to print.
|
|
Print DPOF Selection
|
Print photos directly from a memory card.
Note: This menu selection only appears if a valid DPOF file is present on the memory card.
|
|
Save to Computer
|
Save photos to your computer.
|
|
Maintenance
|
- Check ink levels.
- Change cartridges.
- Align cartridges.
- Clean cartridges.
- Print a test page.
|
|
Defaults
|
- Restore default settings.
- Specify the size of the paper loaded in the paper support.
- Specify the size of the photo you want to print.
- Select to turn Preview before Print on or off.
- Select a language for the display text.
- Adjust when settings are cleared (After 2 minutes or Never).
- Specify when the All-In-One enters Power Save mode.
|
Software
The All-In-One software consists of these components:
- The Lexmark Imaging Studio-managing and printing your photos
- The All-In-One Center-scanning, copying, and faxing
- Print Properties-printing
- The Lexmark 6200 Series Solution Center-troubleshooting, maintenance, and cartridge ordering information
- The Lexmark Photo Editor-editing photos and graphics
- The Lexmark Fast Pics-transferring digital photos
Using the Lexmark Imaging Studio
The Lexmark Imaging Studio lets you complete tasks quickly and easily by opening the correct component for the task you want to complete.
Use one of these methods to start the Lexmark Imaging Studio:
- Double-clicking the shortcut icon on your desktop.
- Clicking the icon in the system tray.
- Clicking Start
 Programs Lexmark 6200 Series Lexmark Imaging Studio.
The Lexmark Imaging Studio appears on your desktop.
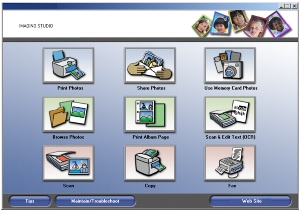
The Lexmark Imaging Studio buttons
|
Click
|
To
|
Details
|
|

|
Print photos
|
Print common photo sizes from saved images on your computer.
|
|

|
Share photos
|
Scan and e-mail an image or e-mail an image saved on your computer.
|
|

|
Use memory card photos
|
Save or print photos from your installed photo memory card.
|
|

|
Browse your photos
|
View saved photos on your computer.
|
|

|
Print album page
|
Print an album or scrapbook page with various photo sizes.
|
|

|
Scan & Edit text (OCR)
|
Scan a document to a word processor to edit its text (OCR).
|
|

|
Scan
|
Scan a photo or document using the Lexmark All-In-One Center.
|
|

|
Copy
|
Copy a photo or document with options to enlarge, reduce, or change other features using the Lexmark All-In-One Center.
|
|

|
Fax
|
Scan and fax a document or an image saved on your computer.
|
|

|
Access the Web
|
Visit the Lexmark Web site.
|
|

|
Learn more
|
Find out more about what you can do with the software.
|
|

|
Get help
|
Use tools to keep your All-In-One working optimally.
|
Using the Lexmark All-In-One Center
Use the Lexmark 6200 Series All-In-One Center software to scan, copy, and fax documents.
Use one of these methods to access the All-In-One Center:
The All-In-One Scanning & Copying tab appears
.
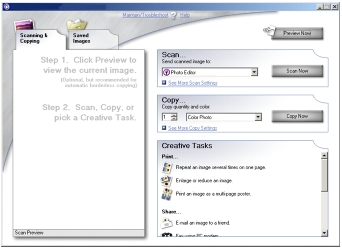
The All-In-One Scanning & Copying tab
The All-In-One Scanning & Copying tab consists of four main sections: Scan, Copy, Creative Tasks, and Preview.
|
From this section
|
You can
|
|
Scan
|
- Select where to send a scanned image.
- Choose what type of image is being scanned.
- Select the scan quality.
Note: Click See More Scan Settings to view all settings.
|
|
Copy
|
- Select the quantity and color of your copies.
- Select a quality setting for your copies.
- Select a blank paper size.
- Select the size of the original document.
- Lighten or darken your copies.
- Enlarge or reduce your copies.
Note: Click See More Copy Settings to view all settings.
|
|
Creative Tasks
|
Choose from a variety of creative ideas:
- Repeat an image several times on one page.
- Enlarge or reduce an image.
- Print an image as a multi-page poster.
- E-mail an image to a friend.
- Fax using the PC modem.
- Save an image on your computer.
- Save multiple photos.
- Edit text found in a scanned document (OCR).
- Modify an image with a photo editor.
|
|
Preview section
|
- Select a region of the previewed image to scan or copy.
- View an image of what will be printed, scanned, or copied.
|
Note: For more information about the All-In-One Main Page, click the Help link near the top of the window.
Saved Images tab
Use the Saved Images tab to perform tasks with images that are saved on the computer. The Saved Images tab consists of four main sections.
|
From this section
|
You can
|
|
Preview section
|
- Show or create folders.
- Preview and select images.
- Rename, delete, or edit selected images.
|
|
Open With...
|
Select where to send the saved image.
|
|
Photo Prints...
|
|
|
Creative Tasks
|
Note: You can also add text to photos (see Adding text captions under your photos).
- Also, perform the same creative tasks available from the All-In-One Main Page Creative Tasks section.
|
Note: For more information about this page, click the Help link near the top of the window.
Maintain/Troubleshoot dialog box
Click the Maintain/Troubleshoot link near the top of the window.
The Maintain/Troubleshoot page provides you with direct links to the Lexmark Solution Center.
Using the Lexmark Solution Center
To open the Lexmark Solution Center:
- Open the Lexmark Imaging Studio.
- Click the Maintain/Troubleshoot button.
The Printer Status tab appears.
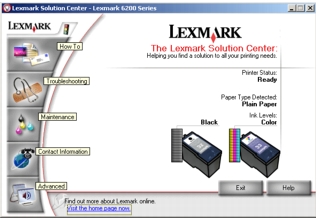
The Lexmark Solution Center consists of six tabs: Printer Status, How To, Troubleshooting, Maintenance, Contact Information, and Advanced.
|
From this tab
|
You can
|
|
Printer Status (default dialog box)
|
- View the status of the All-In-One. For example, while printing, the status is Busy Printing.
- View the ink levels of the print cartridges.
|
|
How To
|
Learn how to:
- Scan, copy, fax, and print.
- Find and change settings.
- Use basic features.
- Print projects such as banners, photos, envelopes, cards, iron-on transfers, and transparencies.
- Find the printable electronic guide.
|
|
Troubleshooting
|
- Learn tips about the current status.
- Solve All-In-One problems.
|
|
Maintenance
|
- Install a new print cartridge.
- View shopping options for new cartridges.
- Print a test page.
- Clean to fix horizontal streaks.
- Troubleshoot other ink problems.
- Align to fix blurry edges.
- Remove Japanese postcard residue.
|
|
Contact Information
|
- Learn how to contact Lexmark by phone, e-mail, or on the World Wide Web.
|
|
Advanced
|
- Change the appearance of the Printing Status window and turn printing voice notification on or off.
- Change the network printing settings.
- Obtain software version information.
|
Note: For more information, click the Help button in the lower right corner of the screen.
Using Print Properties
Print Properties is the software that controls the printing function when the All-In-One is connected to a computer. You can change the settings in Print Properties based on the type of project you want to create. You can open Print Properties from most programs:
- With your document open, click File Print.
- In the Print dialog box, click the Properties, Preferences, Options, or Setup button (depending on the program or operating system).
The Print Properties screen appears
.
The I Want To menu
The I Want To menu appears when you open Print Properties. It contains a variety of task wizards-printing a banner, printing a poster, printing a photograph, printing an envelope, printing on both sides of the paper- to help you select the correct print settings for your project. Close the menu for a full view of the Print Properties dialog box.
Print Properties tabs
|
From this tab
|
You can change these settings
|
|
Quality/Copies
|
Quality/Speed—Select a Quality/Speed setting.
Multiple Copies—Customize how the All-In-One prints several copies of a single print job, collated or uncollated.
Print Color Images in Black and White—Select this to print color images in black and white.
Paper Type—Select the type of paper you are using or allow the printer sensor to select the paper type for you.
|
|
Paper Setup
|
Paper Size—Select the size of the paper you are using, and choose if you want to print borderless.
Orientation—Select how you want the document oriented on the printed page. You can print portrait or landscape.
|
|
Print Layout
|
Layout—Select the layout you want to print.
Duplexing—Select this when you want to print on both sides of the paper.
|
Note: For additional information about these settings, right-click a setting on the screen, and then select What's This?.
Save Settings menu
From the Save Settings menu, you can name and save the current Print Properties settings for future use. You can save up to five custom settings.
Options menu
Use the Options menu to make changes to the Quality Options, Paper Type Sensor Options, Layout Options, and Printing Status Options settings. For more information on these settings, open the tab dialog box from the menu, and then click the Help button on the dialog box, if the button is available.
The Options menu also provides you with direct links to different parts of the Lexmark Solution Center, as well as software version information.
Using the paper type sensor
Your All-In-One has a paper type sensor that detects these media types:
- Plain paper
- Transparencies
- Coated paper
- Glossy/Photo paper
By default, the paper type sensor is on. However, if you want to turn the paper type sensor off and select your paper type:
- With your document open, click File Print.
The Print dialog box appears.
- From the Print dialog box, click Properties, Preferences, or Options.
- From the Print Properties dialog box, select the Quality/Copies tab.
- From the Paper Type area, select Use my choice and choose your paper type from the drop-down box.
Note: Your All-In-One can detect the type of paper you are using. It cannot detect the paper size.
Turning the paper type sensor back on
- With your document open, click File Print.
The Print dialog box appears.
- From the Print dialog box, click Properties, Preferences, or Options.
- From the Print Properties dialog box, select the Quality/Copies tab.
- From the Paper Type area, select Use printer sensor.
Note: For more information, click Help at the top of the screen.
Using the Lexmark Photo Editor
Use the Lexmark Photo Editor software to edit graphics. To open the Lexmark Photo Editor, click Start Programs Lexmark 6200 Series Lexmark Photo Editor.
The Lexmark Photo Editor appears.
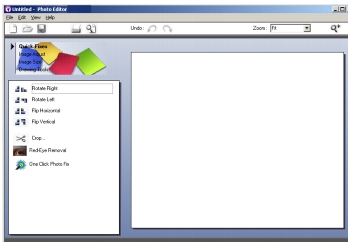
Use one of the following tool sets to modify your photos:
- Quick Fixes
- Image Adjust
- Image Size
- Drawing Tools
Note: Move your pointer over each tool for a description.
Accessing Lexmark Fast Pics
Use Lexmark Fast Pics to save or print photos from your digital camera memory card.
Use one of these methods to open the Lexmark Fast Pics:
- From the Lexmark Imaging Studio, click the Use Memory Card Photos button.
The Fast Pics window appears.
.jpg)
With Fast Pics, you can:
.jpg)