Replacing the print cartridges
Refilling the print cartridges
Aligning the print cartridges
Cleaning the print cartridge nozzles
Preserving the print cartridges
Ordering supplies
Recycling Lexmark products
Replacing the print cartridges
The Lexmark 6200 Series uses the cartridge part numbers as shown below.
|
Left cartridge carrier:
Black or Photo cartridge
|
Right cartridge carrier:
Color cartridge
|
|
|
|
|
Note: See Ordering supplies.
|
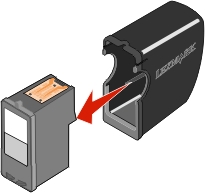
Removing a used cartridge
Note: Make sure the All-In-One is on.
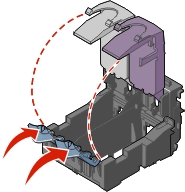
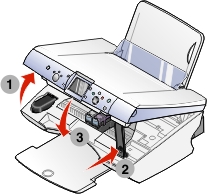
- Lift the scanner unit. The print cartridge carrier moves and stops at the loading position.
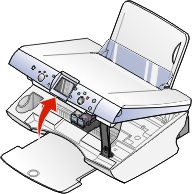
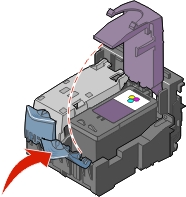
- Press down on the cartridge lever to raise the cartridge lid.
- Remove the old cartridge. Dispose of empty ink cartridges (see Recycling Lexmark products). Use the cartridge storage unit that came with your photo cartridge to store partially used cartridges for future use. See Using the cartridge storage area.
Note: If you are removing both cartridges, repeat steps 2 and 3 for the second cartridge.
Installing the print cartridges
Note: If you are installing a photo print cartridge, remove it from the print cartridge storage unit. Place the empty print cartridge storage unit in the cartridge storage area. For help, see Using the cartridge storage area.
- If you are installing new cartridges, remove the sticker and transparent tape from the back and bottom of the cartridges.
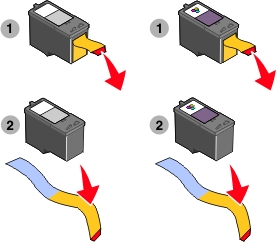
Warning: Do not touch the copper contact area on the back or the metal nozzles on the bottom of the cartridges.
- Unless they are already open, press down on the cartridge levers to raise the cartridge lids.
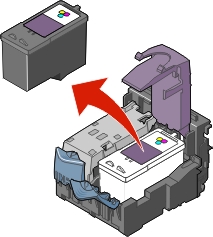
- Insert the black cartridge or the photo cartridge in the left carrier. Insert the color cartridge in the right carrier.
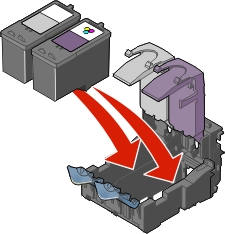
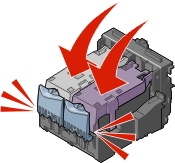
- Snap the lids closed.
- Close the scanner unit.
Note: The control panel display will prompt you to print an alignment page.
Note: The scanner unit must be closed to start a new scan, print, copy, or fax job.
Refilling the print cartridges
Lexmark's All-In-One warranty does not cover repair of failures or damage caused by a refilled cartridge. We do not recommend use of refilled cartridges. Refilling cartridges can affect print quality and may cause damage to the All-In-One. For best results, use Lexmark supplies. See Ordering supplies.
Aligning the print cartridges
You should align your print cartridges after installing them to improve print quality.
Using the computer
- Load plain paper. For help, see Loading paper.
- Open the Lexmark Solution Center. For help, see Using the Lexmark Solution Center.
- From the Maintenance tab, click Align to fix blurry edges.
- Click Print.
Using the control panel
- Load plain paper. For help, see Loading paper.
- Press Menu.
The menu appears.
- Press the down arrow button until you highlight Align Cartridge.
- Press Select.
Note: Discard the page after it prints.
Cleaning the print cartridge nozzles
Clean the nozzles when:
- Characters are not printing completely.
- White dashes appear in graphics or printed text.
- Print is smudged or too dark.
- Vertical, straight lines are not smooth.
- Colors on print jobs are faded or they differ from the colors on the screen.
Using the computer
- Load plain paper. For help, see Loading paper.
- Open the Lexmark Solution Center. For help, see Using the Lexmark Solution Center.
- From the Maintenance tab, click Clean to fix horizontal streaks.
- Click Print.
A nozzle page prints, forcing ink through the nozzles to clean the clogged nozzles.
- Print your document again to verify your print quality has improved.
If print quality has not improved, try cleaning the print cartridge nozzles up to two more times.
Using the control panel
- Load plain paper. For help, see Loading paper.
- Press Menu.
The menu appears.
- Press the down arrow button until you highlight Clean Cartridge.
- Press Select.
A nozzle page prints, forcing ink through the nozzles to clean the clogged nozzles.
- Print your document again to verify your print quality has improved.
If print quality has not improved, try cleaning the print cartridge nozzles up to two more times.
Preserving the print cartridges
- Keep a new print cartridge in its packaging until you are ready to install it.
- Keep your photo or black cartridge in the print cartridge storage unit when not in use. A print cartridge storage unit is included with new photo print cartridges.
- Do not remove a print cartridge from the All-In-One except to replace, clean, or store it in an airtight container, such as the print cartridge storage unit. The print cartridges will not print correctly if left exposed for an extended period of time because the ink will dry out.
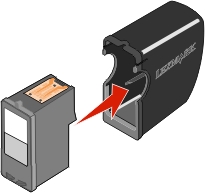
Using the cartridge storage area
- Place the cartridge in the print cartridge storage unit.
- Lift the scanner unit.
- Place the print cartridge storage unit in the cartridge storage area.
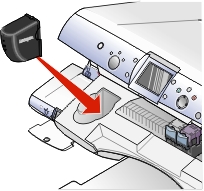
- Close the scanner unit.
Ordering supplies
To order supplies or locate a dealer near you, visit the Lexmark Web site at www.lexmark.com.
|
Item
|
Part number
|
|
Photo cartridge
|
|
|
Black cartridge
|
|
|
Color cartridge
|
|
|
USB cable
|
12A2405
|
Recycling Lexmark products
To return your Lexmark products to Lexmark for recycling:
- Visit our Web site: www.lexmark.com/recycle
- Follow the instructions on your screen.