 Understanding the software
Using the paper type sensor
Understanding the software
The Lexmark 810 Series software consists of these components:
- Print Properties (for printing).
- The Lexmark Solution Center (for troubleshooting, maintenance, and cartridge ordering information).
- Lexmark Precision Photo software (for editing and printing photos).
Using Print Properties
Print Properties is the software that controls the printing function. You can change the settings in Print Properties based on the type of project you want to create. You can open Print Properties from almost any program:
- From the program File menu, click File
 Print.
- In the Print dialog box, click the Properties, Preferences, Options, or Setup button (depending on the program).
The Print Properties screen displays along with the I Want To menu.
Changes made to the settings apply only to the file you have open.
However, Print Properties can also be accessed from the Printers folder without opening any other program:
- Select Start Settings Printers.
- Right-click Lexmark 810 Series and select Printing Preferences.
- Make the changes you want and click OK.
Changes made to the printer settings from the Printers folder become the default settings for most programs.
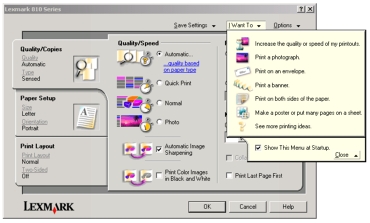
The I Want To menu
The I Want To menu displays when you open Print Properties. It contains a variety of task wizards to help you pick the correct settings for your project.
Print Properties tabs
All of the print settings are on the three main tabs of the Print Properties software: Quality/Copies, Paper Setup, and Print Layout.
Quality/Copies tab
|
From:
|
Select:
|
|
Quality/Speed
|
- Automatic, Draft, Normal, or Photo, depending on the quality of the output you want. Draft is the fastest option.
|
|
Multiple Copies
|
- Collate Copies if you want to print more than one copy of a document. This option prints all the pages of the first copy, and then all the pages of the second copy, and so on.
- Print Last Page First if you want to print the pages in reverse order.
- The number of copies you want to print.
|
|
Paper Type
|
- To see the paper type found, click view the paper type automatically detected.
|
|
Select Print Color Images in Black and White to save the ink in your color cartridge.
Select Automatic Image Sharpening to automatically select the best image sharpening level based on image content.
|
Paper Setup tab
|
From:
|
Select:
|
|
Paper Size
|
Paper, Envelope, Banner, or Borderless, and then select the size specific to your paper type. If your paper size is not listed, select Custom Size.
|
|
Orientation
|
Portrait or Landscape.
|
Print Layout tab
|
From:
|
Select:
|
|
Layout
|
Normal, Banner, Mirror, N-up, Poster, Booklet or Borderless.
|
|
Duplexing
|
- Two-Sided to print your document on both sides of the page.
- Side Flip or Top Flip to set which way the pages of your finished documents turn.
Note: If you select Side Flip, the pages of your document turn like the pages of a magazine. If you select Top Flip, the pages turn like the pages of a legal pad.
|
Using the Lexmark Solution Center
The Lexmark 810 Series Solution Center (LSC) is a valuable information resource.
To open the LSC:
Click Start Programs Lexmark 810 Series Lexmark Solution Center.
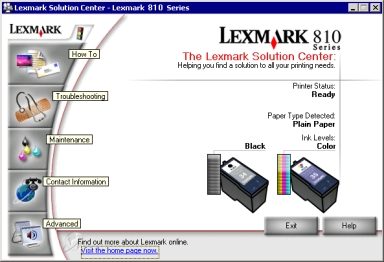
The LSC consists of six tabs: Printer Status, How To, Troubleshooting, Maintenance, Contact Information, and Advanced.
|
From this tab
|
You can
|
|
Printer Status (Main dialog box)
|
- View the status of the printer. For example, while printing, the status is Busy Printing.
- View the ink levels of the print cartridges.
|
|
How To
|
Learn how to:
- Find and change settings.
- Use basic features.
- Print banners, iron-on transfers, photos, envelopes, and other items.
|
|
Troubleshooting
|
|
|
Maintenance
|
- Install a new print cartridge.
- View shopping options for new cartridges.
- Print a test page.
- Clean to fix horizontal streaks.
- Align to fix blurry edges.
- Troubleshoot other ink problems.
- Remove Japanese postcard residue.
|
|
Contact Information
|
- Learn how to contact Lexmark by phone, e-mail, or on the World Wide Web.
|
|
Advanced
|
- Change the appearance of the Printing Status window and turn printing voice notification on or off.
- Change the network printing settings.
- Obtain software version information.
|
Note: For more information, click Help at the bottom of the screen.
Using the paper type sensor
Your printer has a paper type sensor that detects these media types:
- Plain paper
- Transparencies
- Coated paper
- Glossy/Photo paper
By default, the paper type sensor is on. However, if you want to turn the paper type sensor off and select your paper type:
- With your document open, click File Print.
The Print dialog box appears.
- From the Print dialog box, click Properties, Preferences, or Options.
- From the Print Properties dialog box, select the Quality/Copies tab.
- From the Paper Type area, select Use my choice and choose your paper type from the drop-down box.
Note: Your printer can detect the type of paper you are using. It cannot detect the paper size.
Turning the paper type sensor back on
- With your document open, click File Print.
The Print dialog box appears.
- From the Print dialog box, click Properties, Preferences, or Options.
- From the Print Properties dialog box, select the Quality/Copies tab.
- From the Paper Type area, select Use printer sensor.
Note: For more information, click Help at the top of the screen.
Using Lexmark Precision Photo software
Use the Lexmark Precision Photo software to locate, edit, and print photos.
To open Lexmark Precision Photo software:
- Double-click the Lexmark Precision Photo icon on your desktop.
Lexmark Precision Photo software displays.
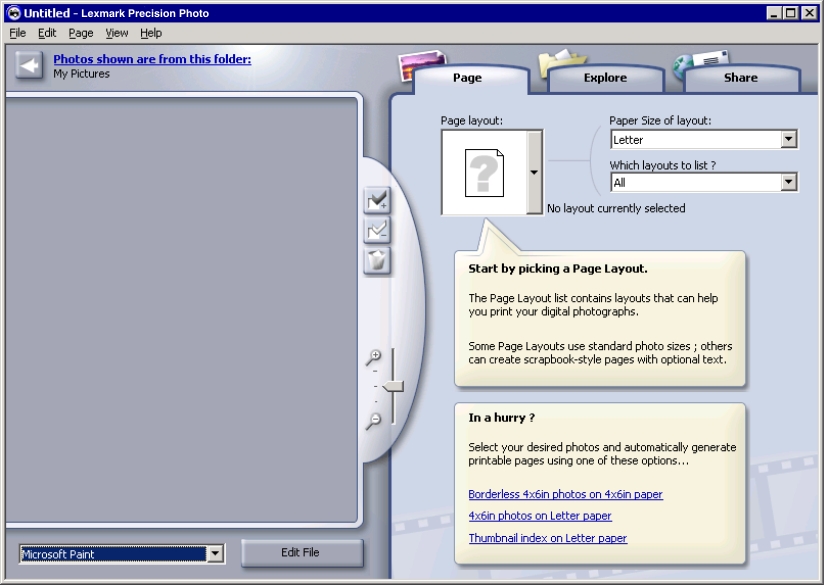
- Click the Explore tab.
- In the directory in the right pane, select the folder where your photos are stored.
Your photos appear in the left pane.