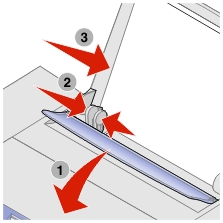
Printing basics

  Loading paper

  Printing documents


Loading paper

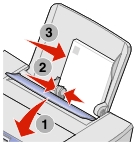
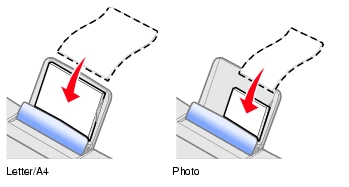
Place the paper against the right side of the paper support with the print side facing you and the top of the paper feeding into the paper support.

  1. Lower the paper feed guard.
  2. Squeeze the paper guide.
  3. Slide it to the left edge of the paper.

Note: Do not force paper into the printer.

Guidelines

Follow these guidelines when loading plain and specialty media in the paper support.

Load up to

Make sure

100 sheets of plain paper

The paper is designed for use with inkjet printers.

10 envelopes

  • The envelopes are loaded vertically against the right side of the paper support.
  • The stamp location is in the upper left corner.
  • The envelopes are designed for use with inkjet printers.
  • You lower the paper feed guard, squeeze the paper guide, and slide it to the left edge of the paper.

Note:  Do not load envelopes with:

  • Holes, perforations, cutouts, or deep embossing.
  • Metal clasps, string ties, or metal folding bars.
  • Exposed flap adhesive.

25 sheets of card stock

  • The card stock is designed for use with inkjet printers.
  • The thickness does not exceed 0.025 inches.

25 greeting cards, index cards, postcards, or photo cards

  • The cards are loaded vertically against the right side of the paper support, with the print side facing you.
  • You lower the paper feed guard, squeeze the paper guide, and slide it to the left edge of the paper.

100 sheets of coated paper

The coated side faces you.

Note:  Since photos require more drying time, we recommend that you remove each photo as it exits and allow it to dry to avoid ink smudging.

25 sheets of photo or glossy paper

The glossy or coated side faces you.

Note:  Since photos require more drying time, we recommend that you remove each photo as it exits and allow it to dry to avoid ink smudging.

20 transparencies

  • The rough side faces you.
  • The transparencies are designed for use with inkjet printers.

Note:  Since transparencies require more drying time, we recommend that you remove each transparency as it exits and allow it to dry to avoid ink smudging.

100 sheets of custom size paper

Your paper size fits within these dimensions.

Width

76 to 216 mm

3.0 to 8.5 in.

Length

127 to 432 mm

5.0 to 17.0 in.

100 iron-on transfers


  • You follow the loading instructions on the iron-on packaging.
  • The blank side faces you.

Note:  For best results, remove each iron-on transfer as it exits.

20 sheets of banner paper

  • The banner paper is designed for use with inkjet printers.
  • You place the stack of banner paper on the top cover, and feed in the first sheet, as shown.
  • Select Letter Banner or A4 Banner in Print Properties. For help, see Using Print Properties.


Printing documents

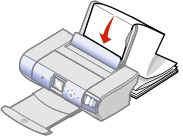
Use your printer and your computer to perform basic or custom print jobs.

Note: For help with printing photos, see Working with digital photos.

  1. Load paper with the print side facing you. See Loading paper.
  2. With your document open, click File  Print.

If you want to change print settings, continue on to the next section.

  1. Click Properties and select the I Want To menu to select a print wizard for a project such as printing an envelope or a banner.
  2. Click OK.
  3. Click OK again to start printing.

Changing print settings

  1. With your document open, click File  Print.
  2. Click Properties, Preferences, Options, or Setup (depending on the program or operating system) to customize print settings.
  3. Choose quality, speed, and paper settings. For more information, see Using Print Properties.
  4. After making any changes in Print Properties, click OK at the bottom of the screen to return to the Print dialog box.
  5. Click OK or Print to complete your task.